
Pat Kellogg Roller, Children’s Science Specialist/Teacher/Retired
INTRODUCTION/OVERVIEW
AGES – Children ages 4 to 12 (Whatever the age, if the child has not done this, you start at First Lessons in Math and Science.
GOAL: With the help of their teachers, the children will be able to create a SCHOOL GARDEN and/or outdoor classroom near their school building. They will be responsible for having the soil tested, preparing the soil, choosing and planting the seeds, weeding the garden, watering and thinning the plants as needed, harvesting and eating food from their garden, and, if needed, selling enough produce from the garden to buy seeds, fertilizer, and whatever else is needed to plant the next garden.
As the land is cleared for the garden a compost heap will be started to recycle plants which are removed.
PURPOSE: The purpose of this web page is to improve math and science in the curriculum. Children build critical thinking and problem-solving skills through high interest, fun, hands-on activities and experiments in math and in science which begin to teach them HOW OUR AMAZING PLANET EARTH WORKS!
A second purpose is to give teachers a practical guide as to how to create and maintain the School Garden.
FOCUS: The children will learn how to recycle plants, how to care for the soil and make it richer by composting plants and animal waste and returning this rich humus to the soil. They will learn how to use the least amount of commercial fertilizer to make a productive garden. They will learn how to plant (nitrogen – fixing plants such as ground nuts or cowpeas which take nitrogen from the air and put it in the soil to make it richer and more productive.
PROCEDURE: Teachers will use the website pages First Lessons in Math and Science, Kid’s Ecology, and Classroom Management on this website. The students work in groups of 5 or so in Cooperative Learning Groups.
SKILLS USED – observing, patterns, interaction and interdependence, change and continuity, adaptation and evolution
SIZE OF GARDEN PLOT – In American schools the plots are usually small raised bed gardens with a class of students for each small plot. Size does not matter so long as it can be taken care of.
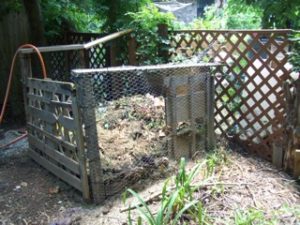
Nothing is wasted. Plants dug up are recycled in the Compost Bin to create rich humus to return to the soil.
MY EXPERIENCE IN THE REGULAR GARDEN; For Raised Bed Gardens, go to my webpage: The Child’s Garden and Sanctuary.
First – My students were 6th and 7th graders. Our decisions to create THE SCHOOL GARDEN were made by all of us. The school principal gave us a vacant lot across from the school where buses had parked for years. Thus it was very hard, tightly packed clay soil, with some rocks. WE WERE GIVEN NO FUNDING AT ALL.
Second, we dug up soil from several places on the lot from about 5 inches deep, bagged it, and took it to our local County Extension Agency (Agriculture) for testing. They tested it, then told us what to do to make our garden able to produce food and flower plants.
Third, we were able to get the School Maintenance Crew to come in and plow the garden. Just after that came some parents, some grandparents, some neighbors. They all brought their tools and wheel-barrows. I appealed to the school PTA for funding. They gave enough to buy a digging hand tool for each of the 35 students in my classes. They also gave enough to buy topsoil, humus, manure, and “diatomaceous earth.” These products loosen clay soil. Everyone got to work removing all the grass, weeds, and rocks. The soil was so poor there was not much of either. When they were finished they carefully worked the enrichment products into the soil.
Meanwhile, I had written a proposal for aid to our local Education Association and we received enough money for some tools, seeds, fertilizer (if needed), and materials to build a “Compost Heap” which we used to recycle all plant material, and bits of newspaper.
Fourth, We chose the site, laid down the hardware cloth, to keep tree roots from feeding on our humus and we built the compost heap. We used all of the plants which had been removed while preparing the soil for plowing.
Then we began to fill the compost heap. We laid abut 6 inches of torn up plant material on the bottom. To that we added about 3 inches of rich topsoil, and sprinkled on a bit of cow manure. We continued layering in this way until the compost heap was full. Topsoil and manure were on the top. We watered it down until all of the stuff in the heap was moist. We kept it moist at all times. This was mid-March and we were ready to plant! (We always put used plant material, soil and manure in layers so rich humus was always ready to be used as fertilizer and to loosen the clay soil.
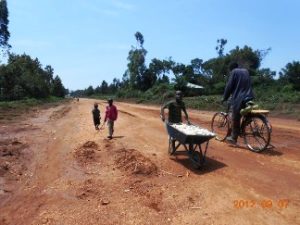
Where did the water come from? The kids filled gallon milk jugs with water from the school and carried it to the garden site across the street. Clearly, we needed WATER pipe laid down to the garden. The school superintendent said NO. What did I do?
I called up a friend at the local newspaper and told her our problem. She agreed to come when the kids, in a single row, were walking out of the school, crossing the street, carrying the 35 full milk jugs of water. She took a picture, wrote the story, and the next day we got word the pipe would be laid to our garden the following day! WE HAD WATER?
Fifth, we still needed garden hose, a lawn mower, wheelbarrow, several 5 gallon buckets, hardware cloth, gravel, edging, and a garden shed and we had run out of money. Serious CREATIVE PROBLEM SOLVING WAS REQUIRED. We needed a unique idea! We were a small college town with several schools but no one had ever created a School Garden.
After much research and debate we decided our garden would be in the shape of Oklahoma, our state. The FAA shop boys agreed to make a sign for each of the high interest natural environmental places in our state as well as the larger waterways. They even supplied the pieces of scrap wood. ha
To raise money, the first growing season, we would plant only marigolds and zinnias. Why? Garden pests do not like the taste of these leaves nor the odor of the flowers. But pollinating insects visit them and get nectar leaving pollen from elsewhere, there”so the plant could reproduce. Also we needed to learn to grow these plants so we could plant them among our garden plants and avoid some garden pests this way. So we planted these seeds all over the garden and a huge supply of these beautiful plants grew. People commented on how beautiful their flowers were. And, our principal and the superintendent each received a beautiful bouquet from small groups of my students!
My friend at the newspaper took a picture of it and explained about the shape of the garden. My students were learning geography also!
The second part of our great idea was that we would pick the seeds, dry them, create drawings of the flower, glue on printed instructions for how to grow it, package the seeds, and sell them for 25 cents each! Enough money was earned to buy everything else we needed! So my students were learning how to make and sell, how to choose quality of purchases, take total care of the money, and how to enchant people into buying the seeds. Indeed they were running a small business!
Sixth – In the spring of the second growing season, we planted salad greens, radishes, and onions the first of March. The kids ate the tiny seedlings where they were too close together and ate them as they appeared. When these plants were at their peak we declared “SALAD DAY.” Enough picked, washed vegetables were sent to the Teacher’s Lounge for all the teachers to have a salad, including the principal, and other office personnel.
My students brought their crackers, dressing and whatever they wanted and we all enjoyed “SALAD DAY” in every one of my classes. They shared with those lacking these things. Children eat what they grow.
Seventh – Summer Garden Care –
In late April, seeds of squash, cucumbers, tomatoes, okra, corn, and green beans were planted. Small groups of my students came twice a week to tend the garden, mow where needed, and pick and eat the vegetables. Some of these kids were really poor, There were no free summer lunches at school, but my students thrived on their own garden.
Eighth – After the summer garden was done, the soil was cleared, spaded, then we put mulch on top of it to hold moisture, and to help protect and save the lives of many helpful garden organisms including earthworms, good bacteria, etc. Earlier, we had used the gravel to make gravel paths for the students to walk on.
MAKING CONNECTIONS – Here is a sample of how I connected life science, environmental science, earth science and nutrition and health. The American Dairy Council provided 4 young white rats, 2 cages, 2 exercise wheels, and cage covers for a Nutrition Unit. In the experiment, 2 of the rats received a perfect diet for growth and development. The other two were fed the same EXCEPT no CALCIUM.
Using the Scientific Method, the students, weighed and measured each rat each week, and wrote down all their observations of behavior as well. At the end of six weeks, the rats fed the nutritious complete diet were larger, stronger, busier, more playful, spent more time on the exercise wheel and less with daytime naps, than the others. Students were responsible for taking complete care of the rats. What the lack of calcium did to the other 2 rats was very clear. The rats became pets and they were taken home by the students. The malnourished rats went to one child ,,whose mother was a nurse, hoping they could make their bones strong and help them grow more.
This experiment, plus their garden experiences had a lot to do with the ease with which the students made the connection between NUTRITION AND THEIR HEALTH. Continuing on in this webpage, The Child’s Garden and Sanctuary, there is an example of a water cachment system, which could be used in the garden collecting water from the garden storage shed roof, and using that some instead of the city water. It is natural water, rain, which the children can hook a hose to.
This helps the kids learn how to conserve our precious, small freshwater supply.
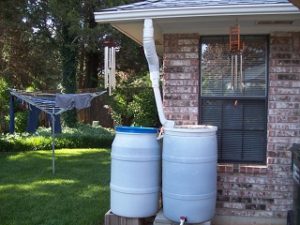
IRRIGATION: This one kind of a Water Catchment System is in our back yard. If you don’t have drains just place the barrels wherever rainwater flows best from the roof. Be sure to cover rain barrels when they are full to keep children out. This is one way to collect water to use on the garden plants when it does not rain. Our systems have a small opening on top, covered with screen wire, which lets the rain into the barrel.
PROBLEMS AND CHALLENGES
Children will have many opportunities to use their critical thinking and problem solving skills as they seek ways to solve problems which happen in the garden. You can get good information from google when you ask questions and do some research.
INSECTS – They will learn by observing which insects are good and which are destroying their plants. Often, they can pick off the insects and put their bodies in the compost heap or feed them to their chickens. Their skills as observer really work well here. Grasshoppers and crickets may eat a lot of leaves quickly but small children become experts at catching them with just a little practice.
OPPORTUNITIES – When children catch insects alive and whole they can begin to learn the parts of the insect. My children state and describe each part while using their own body parts in a rapping sing-song little bit of fun. It is fun, it is educational, and it helps kids to know the difference between an insect, and a non-insect like a sow bug or a spider. When they
learn these characteristics of insects they will use this knowledge all their lives and never forget it
Other problems include too little or too much rain, hail storms, predators such as large birds and dogs. Children learn how to accept disappointment without losing hope. When plants are lost in a flood or a hailstorm, the children may be able to get some food from the dead plants and then recycle them to make the soil richer. These things go with becoming nature’s caretakers. In time they will learn which plants have the best chance of surviving these weather events and they will choose to plant these plants. It is all about observing then using creative problem solving to solve the problems. Should not this be what education is about? And with Climate Change, don’t we really need it now.
When you practice the Insect Rap below make it fun. Say it slowly and act out with the children’s body parts moving. It is good for the teachers to practice this before teaching but don’t let the kids see. They may laugh too hard at their dear teachers doing the rap.
THE INSECT RAP
An insect is an organism with 6 legs and 3 main body parts. (Standing children hold up 6 fingers, then 3 fingers to match the words as they say the words.)
The 3 body parts are the head, the thorax and the abdomen. (Put one hand on top of head, one on bottom of chin for head) (For the thorax put one hand at top of chest and other hand at waist line. (For the abdomen, put one hand at waist line and one hand on rest of body to the top of thighs.)
Most insects have 2 antennae, 2 pairs of wings, and a hard exoskeleton.(To make antenna point with one finger above each eye and wiggle fingers.) (To make wings put hands on waist and holding there flop arms up and down or sideways like you are flying.)
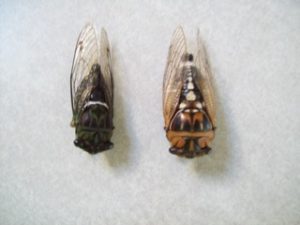
To describe the exoskeleton which covers the entire insect use hands to form an oval from head to toe of themselves. (Exoskeleton means outside skeleton.) Children have an endoskeleton. That means their skeleton is inside their bodies. The exoskeleton is shed and a new one forms to allow the insect to grow. Look for exoskeleton shells in the garden. While the new exoskeleton grows, the insect hides out because it is vulnerable.
Stages of insect development include ……… the egg — the larvae—- the pupa —and the adult. (For egg make a circle of two fingers.) ( For the larvae move hand like a worm crawling.) (For the pupa (sleeping stage — fold hands lay on chin, tilt chin sideways and close eyes.) (For the adult, spread arms and lift both arms high in celebration.)
You have real live insects to work with and children are fascinated with using these skills in the garden. Repeat this little Rap with them until they not only know what it says but some will take turns leading the group. When they are observing moving organisms in the garden you will hear them softly say the rap and observe them counting off body parts after they know the insect rap well.
CHEMISTRY IN THE GARDEN
On my website menu there are three web pages on how to teach young children the first lessons in chemistry. Chemistry happens in the garden all the time as plants interact with the soil, air, water, and sunlight. Making soap is a fun chemistry activity which can be used in insect control as well as in hygiene (hand-washing after toileting and before eating.)
Another important lesson is the chemistry of metal and rust. Oxygen interacts with dirt and moisture on metal garden tools and rust begins to form as the metal is being broken down. You can see the rust eating the metal! You can teach the children to control this chemical reaction by washing their metal garden tools, drying them, and putting a little oil on them to protect them from oxygen. Store them inside a building where it is dry.
Ask the internet for a recipe for making homemade soap. Find an easy one you can try and make a very small batch at first. You must follow the directions especially the correct measurements. I suggest you take a recipe to the market where the ladies are selling soap they made and ask them if the recipe would work with ingredients available there. They might even give you their recipe if they know you are a teacher of small impoverished children who need to learn to wash their hands to stop diseases which make them sick. Be sure to protect your skin, and your eyes as this is a caustic chemistry experiment.
May you teacher, be blessed and happy as you bring children along in learning ‘HOW OUR AMAZING PLANET WORKS!”