
Pat Kellogg Roller, Children’s Science Specialist/Teacher/Retired
OVERVIEW
WHY THIS EXPERIMENT?
Many people have become concerned about the herbicides, pesticides, chemical fertilizers, and genetically modified seeds in plants and antibiotics and growth hormones in animal feed. They recognize that all these things pass into our bodies as we consume these foods. In science we call this a food chain. For more, check out the page “Kids Ecology” on this website.
The purpose of this experiment is to discover which plant fertilizer is safest and best for growing food in our gardens. In this easy, fun, creative problem-solving plant experiment, children learn how to use natural safe fertilizer without depending on chemical fertilizers, made from crude oil.
As they continue to learn how our amazing planet works! They learn earth awareness and earth care as they compost plant and animal waste to make soil fertile and ready to grow more good food.
Plants we eat need water, light, air, space, and fertile soil to create the most food possible.
Good garden soil needs to have minerals from the parent rock underneath the soil; and humus from plant and animal decay and waste, which acts as fertilizer, providing plant nutrients. In this experiment, we will try different kinds of fertilizer to see which one helps plants grow best. Chemical fertilizer is made from crude oil and should be avoided. Used for a long time it will make the soil unfit to grow anything. Fact Check this out with China.
We encourage you to visit other pages on this website. The School Garden, The Child’s Garden and Sanctuary, Earth Care and Share, and Kid’s Fun Water Experiments.
WHICH PLANT FERTILIZER IS BEST AND SAFE TO USE?
SUPPLIES NEEDED
For each Cooperative Learning Team, of 4 to 5 students you will need:
paper, pencils, small cards, rulers, 4 same size containers, each about 4 inches (10cm), with holes in the bottom for each group of students, regular soil, decayed plant and animal waste, blood and bone meal, chemical fertilizer, bean seeds, hand tools. The students work in “Cooperative Learning Teams.” Visit the Classroom Management page in this website for help with organizing and managing the students in “hands-on” experiments.
PROCEDURE: Write down each thing you did in setting up the experiment.
1 . Write the purpose and your hypothesis (what you think will happen) in the experiment. Write the date.
2 . Purpose: Which fertilizer added to the soil will help beans grow best?________________
3 . Hypothesis – The soil with ______________________ added will help the beans grow best. (Fill in the blank with your guess.)
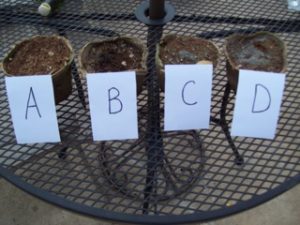
4 . Each team will label the four containers A, B, C, D. (Be sure there are drainage holes in the bottom of the CONTAINERS.)
5 . Fill each container 2/3 full of soil.
6 . Container A will have just regular soil. Container B will have regular soil with ½ cup of decayed animal manure added, Container C will have regular soil with ¼ cup of blood and bone meal added, and Container D will have one teaspoon of chemical fertilizer added. I GOT THIS REGULAR SOIL FROM MY YARD, OR YOU CAN USE GOOD TOPSOIL YOU BUY AT THE STORE.
7 . Chemical fertilizer is much stronger and too much will burn the plants.
 .
.
8 . Mix each soil with its fertilizer very well, and then add more soil to fill up each container and mix again.
9 . Plant 4 bean seeds an equal distance apart in each container. Plant the seeds about 2 inches (5 cm) deep in the soil. Press down on the soil so the beans do not float up when watering. Be sure all the bean seeds are alike.
10 . Water each container until the soil is moist all the way through each container.
11 . Keep the soil moist with water in each container, and observe each day. (Take care not to add too much water.)
12 . Record on your lab sheet the date when the seeds changed to plants, and poke their tiny stem and leaves through the soil.
13 . Write down how many plants grew in each container. ___________
14 . Write down how many leaves each plant has. __________________
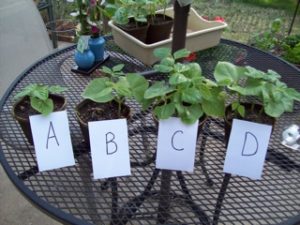
OBSERVATIONS
Record all of this. Which plants grew best? Observe height of plants, number of leaves, size of leaves, number of plants, and color of leaves, (should be dark, healthy looking green.) Write down the results of your experiment. WHICH PLANT FERTILIZER WORKED BEST, safe to use. ____________________ Which plant grew second best? ___________________Ask people who are good gardeners what they think.
CONCLUSION
My hypothesis was __________________. Write if your guess was true or false. WRITE WHAT YOU LEARNED AND HOW YOU CAN USE WHAT YOU LEARNED.
You may transplant your bean plants out in your garden. Be sure they will get sunlight. Give each plant about 8 inches of space (20 cm). Add A LITTLE OF THE BEST SAFE FERTILIZER IN EACH HOLE AND MIX IT INTO THE SOIL WELL before putting the seedling and a little water in the hole.
Plant the bean seedlings deep in the soil until only the leaves show. Press the soil down around the plant with your hands. Water them well and watch them bloom and make good beans for you and your family to eat. They taste best when you just pick and eat raw.
Bean seeds can be dried and kept for the dry season when garden plants do not grow. They will keep fresh for months. Bean seeds help you to be healthy and strong.
HOW TO MAKE PLANT AND ANIMAL WASTE INTO FERTILIZER. Compost plant waste to make rich soil.
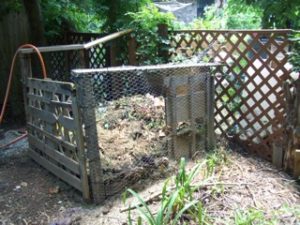
1 . We call this a compost heap. Lay down hardware cloth on the bottom to keep plant roots from coming through the humus with hundreds of tiny roots feeding on the humus.
2 . Surround a space about 6 feet in diameter with cement blocks or wire. If wire, build a frame around it as seen in the picture. Make a gate on one end. Make sure air can get into the heap from the sides and the top. Place thin pieces of wood every 2-3 feet and staple the chicken wire onto these pieces of wood if you choose a wooden one. They support the compost heap and keep the chicken wire in place.
3 . FIRST – put about 6 inches of torn up plant material on the bottom. On top of that, add at least 3 inches of good topsoil. On top of that sprinkle some fertilizer of your choice, cover, then continue building layers with these ingredients in this order as you go along. Keep it moist all the time.
4 . As you garden, some plants will be finished with making food. Tear up these plants and lay them on the soil in the compost heap. Add dried leaves. If you have it, add animal waste on top of that. Put a thin layer of regular soil on top of that.
5 . Keep making layers of plant waste, animal waste, and soil. Keep your compost heap moist.
6 . Watch to see worms, sowbugs, and insects move in to help break down the plant and animal matter and change it into a rich black fertilizer we call humus.
7 . Bacteria we cannot see also help break down the waste. Composting, (making humus) works faster, if you use a shovel and turn it all over every now and then to mix it all together. Wear gloves when you work with your compost.
8 . By doing this, you can help recycle waste to help soil grow more plants. When it is time to plant your garden, work this humus in the soil and watch it help plants grow!
You can get more help in doing this by looking at my webpage at The Child’s Garden and Sanctuary, on my website. Remember this humus you help create is safe. Chemical fertilizer is not.
Could you make a garden with your friends or your schoolmates and share the food with everyone? Now that you have learned so much, why not try it. I think you can do it! I have done it myself for over 70 years!
The end