
Pat Kellogg Roller, Children’s Science Specialist/Teacher/Retired
Objects – Properties – Organisms
BACKGROUND/OVERVIEW
Grade Level or Ages – Preschool, Primary, Elementary School – ages 4-12
Kg, first and second graders will need more help than older children.
Concept – In Kids Ecology, the word “SPICE” is used as an antonym. the (S) stands for Variety and Similarity (likenesses and differences).
Purpose – To help children develop skills in observation, classification, computation, and communication. Children manipulate common natural objects by sorting, grouping, ordering, arranging and identifying first science vocabulary words. In math children manipulate objects to count and to solve simple math problems. They use these skills for observing and communicating likenesses and differences in objects and organisms.
Lesson 1 – Sort, Order, and Count the Students
1 . Sort the students into a Boy Group and a Girl Group. How many students are in each group? Which group has more students? How many more? How many students in all?
2 . Help students order themselves from shortest to tallest.
3 . Help students order themselves from youngest to oldest.
4 . Learn this song together: “About Us” – “We are all students. Some are boys. Some are girls. Some are shorter. Some are taller. Some are younger. Some are older. We are all smart students!”
Vocabulary
1 . Object – a thing
2 . Properties – words which describe things
3 . Classification – To arrange objects according to a certain property or properties.
4 . Organisms – things which have lived or are living now.
The five senses are used to describe properties of organisms. (seeing, hearing, touching, feeling, tasting.)
Common Physical Properties
Objects are grouped using one property at a time. Common properties are: color, size, shape, texture, hardness or softness, odor, taste (sour, sweet, etc.
Objects Needed – different kinds of seeds, rocks, shells, leaves, flowers, soils, sticks, feet, hands, feathers, cloth, etc. There should be some objects in each group that are alike, some different, so that each group generally has more than one object in it. After practicing all the properties on one group of objects, change to another group and continue.
Lesson 2 – “Objects, Properties, Ordering” (seeds)
Procedure
Use my Classroom Management website page to learn how to set up Cooperative Learning Teams and how to organize the materials needed for each lesson. Get help and teach responsibility while ensuring each child has a job important to their group. Usually there are 5 students in each group.
Gather needed materials for Lesson 1. Different kinds of seeds, paper on which to sort the seeds, paper, pencils. They should write the name of the property they are using.
Help the children learn how to group themselves and the job each group member is to perform for his/her group.

The objects are organisms called seeds. . The property we sort them with is COLOR.
1 . Today we will sort these seeds by the property COLOR. If all of the seeds are about the same color, sort them by SHADES of COLOR (lightest to darkest.)
2 . Check each group to see how they are doing. Help as needed.
3 . Write the word COLOR on a large piece of cardboard or paper.
4 . Post that word on the wall so kids can see it every day and learn it. Practice saying the word and spelling the word.
5 . Help the children write the word COLOR on their paper.
6 . Help them as needed to write the names of the colors (brown, green, red, orange, black, etc.
7 . Ask the children to count how many seeds are in each group.
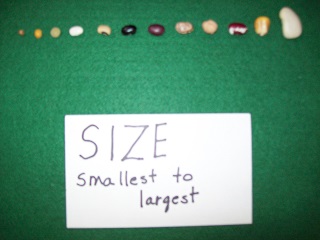
The objects are seeds. We order them by the property SIZE.
1 . Ask the children to make a long line of their seeds ordering them from smallest to largest. Or order them from shortest to longest.
2 . Ask the children to count how many seeds in all for each group of students.
3 . If old enough, ask the children to use the seeds to do some simple math problems such as 3 seeds + 2 seeds = 5 seeds. Or 5 seeds – 3 seeds = 2 seeds.
4 . You have been combining math, science, reading, writing, communicating verbally, cooperating, sharing, etc. That is what kid’s science does. It combines everything while kids use objects to help them remember.
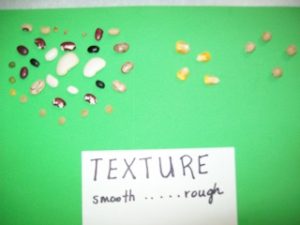
The objects are SEEDS. We sort them by the property TEXTURE. (smooth to rough)
You can use the same objects (seeds) in Lesson 2. You just repeat this process in Lesson 3. This time choose a different property. It may be size. It may be shape. Just keep using this procedure, reinforcing the vocabulary with “hands-on” fun until the children have learned to sort by each of the properties using the lessons above and your own.
Once they can sort by as many of these properties as possible, then give each group seeds and tell them to sort them by whatever property they want to.
When the sorting is finished, ask a reporter for each group to tell the class to name the property their group used to sort the seeds and to explain how they did it.
Activity – Germinating Seeds
Bean seeds work well for this activity. Soak several in water overnight to soften the seed coat. Then lay them out on a damp cloth. They should not touch each other. Cover them with another damp cloth and keep the cloths damp. Put them in a warm place.
In a few days many of the bean seeds will begin to change. A tiny pair of folded green leaves will appear. A few more days and the stem will appear, then tiny roots.
The roots hold the plant in place and gather nutrients and water from the soil.
The stem delivers the water and nutrients to the leaves.
In the leaves, the plant uses the water, the soil nutrients, gases from the air and sunlight to grow and to make food.
Plants make food for themselves and for us to eat. What else eats plants?
Plant a few of the germinating seeds in soil letting the tiny leaves show above the soil. Observe their growth. Keep them moist.
Lesson 4 – Change to a Different Set of Objects
Leaves are really good objects to use in Objects and Properties. Show the children how to help you collect different kinds of leaves. Be sure you have more than one of each kind but not too many in all. Follow the example of the seeds lessons using the leaves.
Continue with other groups of objects found in nature until the students have built good observation and communication skills. Help them learn vocabulary words such as objects, properties, organisms, etc.
Repeat the procedure with each group of objects until the children have become very good at this. You will see growth in every skill especially observation. This knowledge and these skills will help them all their lives. The kids like to do it and they like to talk about what they do.
Plugging in Variety and Similarity (likenesses and differences)
As skilled observers and classifiers, the students are ready for the following questions.
1 . How are all the leaves alike? Answer: All are leaves. All can make food. All are living organisms, etc.
2 . How are the leaves different? Answer: Different shades of green, different sizes, shapes, thickness of leaves, leaf edges, etc.
Continue in this way with each group of objects until kids do it easily. At this point they will be able to compare likenesses and differences (Variety and Similarity) with all living and non-living things.
Going Further with Leaves Activity
This is a great time to have kids identify those little lines which are really tiny tubes that deliver water and other needed nutrients to every part of the leaf. Use a complete garden plant to show how water and nutrients flow upward from the roots, up the stems and out to the leaves so leaves can make food. The plant also collects needed gases from the air. In some plants, extra food goes back down the tubes to be stored in the roots (potatoes, carrots, radishes, etc.).
This allows the leaf to interact with light from the sun and make food for the plant. The plant makes food for us and for animals also.
We give the plants carbon dioxide when we breathe out and the plants give us oxygen which we breathe in. This oxygen is carried in our blood to all parts of our bodies helping change our food into energy for work and play.
Remember, only green plants can make food!
Variety and Similarity in Feet Are Neat Activity
At your school, how are feet alike? How are feet different? Draw an outline around one of your feet. Your feet are the best looking feet. How do your feet help you? How do you take care of your feet? Have everyone draw an outline of their feet on a long paper. Children decorate their feet as they see fit. . See if they can identify which drawing matches which foot by the decorations.
Students are now ready for webpage The School Garden.
My webpage menu, Kids Ecology has all of the “SPICE” concepts described. Every one of them may be taught in The School Garden
It is now easy to take children on SPICE Adventure Walks in the garden and in surrounding outdoor areas. They can remember and apply each concept taught in SPICE as they walk the outdoor areas and observe. I like to have them practice one concept at a time. So the first SPICE Adventure Walk would focus on finding examples of Variety” and “Similarity.
Everything you need to lead children in these SPICE Adventure Walks is on the Kids Ecology webpage. Read it to the students a bit at a time then go out and do it together one concept at a time until they can do them all at once. Go to the “BOOKS” on the home page of our website, click on the book Pink Hat’s Adventure With SEAGULLS, HATS, AND DANCING FEET. It’s good to read to the children the part connected to variety and similarity and even all of it if you wish. It’s about a SPICE Adventure Walk.
For example your next walk together would focus on the (P) in SPICE which stands for PATTERNS.
As children use the observation and math skills you have taught them, they are then ready to conduct experiments in the garden.
Some Good Experiments in The School Garden
Students are ready to learn how to enrich the soil by comparing plant growth of soil treated with compost, manure, blood and bone meal, chemical fertilizer, or just the soil with no added nutrients.
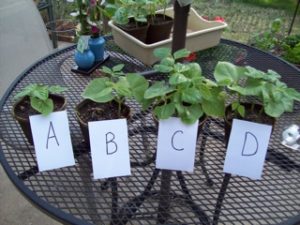
Which plant had no added nutrients? Which plant had only compost humus added? Which plant had bone and blood meal added? Which plant had chemical fertilizer added?
On my website on the web page, The School Garden they can learn how to create a garden and how to start and maintain a Compost Heap to enrich the soil. On our website, take a look at Experiment with Plant Fertilizers.
Ask the children “Why do our metal tools like our shovels rust?” In this chemistry lesson children learn that rust forms when oxygen from the air interacts with soil and moisture on the tools. We call it oxidation or rust. The rust is actually eating up the metal! This is called a “chemical reaction.” Help the children learn to clean their metal tools after each use, to dry them. And then rub a little bit of oil or fat on them to keep the oxygen out. Keep an oily rag around for that purpose. Store them where it is dry inside the school.
Does this give you an idea of how important chemistry is for everyone?
May you have more fun and adventure than ever before as you help kids learn how our amazing planet works!