
Pat Kellogg Roller, Children’s Science Specialist/Teacher/Retired
BENEFITS OF A BACKYARD LIVING LABORATORY FOR KIDS
INTRODUCTION/OVERVIEW
THE PARTS OF THIS WEBPAGE ARE:
1. Short story of what happened in our small backyard small raised bed garden and sanctuary, when 22 kids, ages, 5-12 came for a visit. It’s similar to what you as a parent and your children may experience. However in this case, the children, with your support, would be in charge of creating it and caring for it.
2. Shows how to add a small “Songbird Sanctuary” next to the small raised-bed garden.
3. Shows how to create the garden, the health and nutrition benefits, how to grow responsible children. Help them learn how to adjust to loss through their own neglect, or because of a bad storm. It’s about building resilient kids who can cope with whatever life throw at them.
4. It may be about their survival. The result of Climate Change may be food shortage. People may survive by living off their gardens.
5. Teaches by “hands-on – hearts-on” activities a great deal about HOW OUR WONDERFUL AMAZING PLANET WORKS. An antonym for the skills gained it SPICE. The S stands for Variety and Similarity, the P for Patterns, the I interaction and interdependence, the C for Change and Continuity, and the E for adaptation and evolution. Sharp observation skills emerge as they view these actions.
For a special treat, under the BOOKS section this website, read: “Pink Hat’s Adventure with Kites,” and “Pink Hat’s Adventure with Seagulls, Hats, and Dancing Feet.”
22 KIDS IN OUR GARDEN-SANCTUARY
Last year 44 kids ages 5-12 came to visit, 22 at a time, our backyard living lab which is a wildlife sanctuary and small raised bed vegetable garden. Only 6 of these children had ever seen a garden. They were there to observe and interact with the green plants, the insects, and to dig up, remove the insects, clean, and eat a cabbage. They saw tomatoes, cucumbers, squash, onions, spinach and other vegetables growing in containers as well as in the garden itself. They got really excited at the insects, which were also eating the cabbage they would eat. So, began the mini – lesson on insects. This was real and exciting hands – on learning!
To help them remember that lesson, they learned the Insect Rap so they would always know how to identify an insect. Afterward, they began to find organisms such as sowbugs aphids, and spiders, which are not insects. It became a Treasure Hunt as they compared differences in insect and non- insect body parts. See how to do the rap at the end of this webpage.
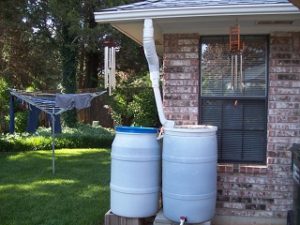
They learned how to collect rainwater from the roof in barrels for the plants when it does not rain. They watched a garden spider weave her web. They saw butterflies feeding on some over-ripe plums. They heard their buzz and observed bees flying from flower to flower gathering nectar and pollen, then moving on to pollinate other flowers.
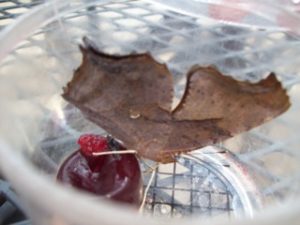
Until it moved, we thought this insect was a leaf! Among the flying insects they observed how some butterflies were camouflaged so when they landed they looked like a small dead brown leaf! Do you see the antenna, the wings?
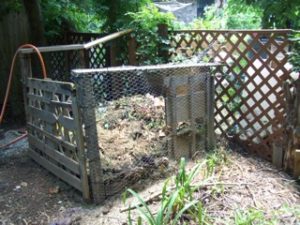
This compost heap is just behind the small garden. A frame with chicken wire sides work great.
They visited The Compost Heap to see how plant material is recycled to make rich humus to put back on the soil. Reduce, reuse, recycle, these words were added to their vocabulary.
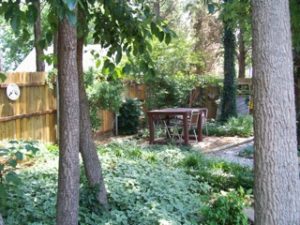
The Songbird Sanctuary is a place of bird song, peace, and harmony.
They saw the beauty and felt the peace of the small wildlife sanctuary as they observed the birds feeding and drinking water. Bird songs filled the air. They watched the birds building their nests for their eggs so they could have baby birds. Looking up into the trees they saw two squirrels chasing each other across the tree line.
All of these exciting experiences in the garden and sanctuary happen when you help develop a backyard living lab for your kids. As they were preparing to leave, I asked them how many would be interested in making their own backyard like this one. Eagerly most of them raised their hands. That is why I am giving some directions for doing this on this webpage. It is our hope that parents will help and support their children as the children engage in these projects. Creating them costs a modest amount of money, but after there is very little cost. You may have spent as much on one birthday party!
Jot down our website address on the front of this page so you have easy access. On the website there is a menu of high interest activities and experiments. A wide range of kid’s experiments give kids the opportunity to build critical thinking and problem-solving skills as they begin to learn “how our amazing planet works.”
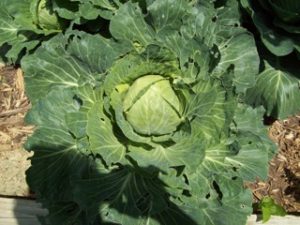
Kid’s cabbage – the first thing they noticed was that the larger cabbage leaves had been chewed and partly eaten. As they explored further they found the green insect larvae, the cabbage worm, chewing away! “Insects have to eat too,” I said. Reluctantly they agreed. They said, “this is not at all like buying a cabbage at the supermarket!” They were challenged by the thought of eating it.
A Backyard Living Laboratory is a child’s habitat where daily, children observe the interaction of light, water, soil, and space on the activities of plants, animals, and insects. As they observe, work, and interact in their own backyard laboratory, their knowledge and skill base will surge. They will want to use the computer to do research to answer some of their questions. This hands-on learning and these skills will serve them well in school and all their lives.
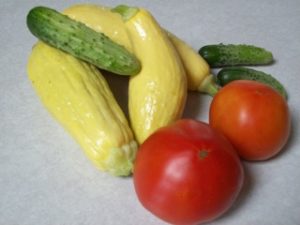
Kids gathered fresh vegetable from the garden. They commented on the good fresh smell, and the firm texture and beautiful colors.
Kids eat what they grow! Green places and good health go together. A Saturday morning cup of coffee or tea is fine as parents spend time with their children outdoors, and they show and tell you all they have seen and done. You may be invited to a breakfast with butterflies. When the potatoes they planted in February are ready to harvest they may have a Breakfast With Friends in the garden- sanctuary. Imagine them serving French fries and a fresh green salad from potatoes and salad greens they helped grow!
Summer boredom disappears as your kids develop self-confidence. This happens as your kids develop responsibility. Expect some mistakes as kids learn. Cause and effect are in full bore press in these experiences. If the kids forget to pull the weeds, water when needed, thin plants that are too close together — then the garden will not be as successful. They will learn from their mistakes. You are there to share amazing experiences with your kids as you learn together. Growing in being responsible is a process achieved over time. Patience, encouragement, and your support are important.
Having read the many good and bad things which may happen, are you ready to begin.Visit website www.savethesongbirds.com for help. Their goal is to save 50,000 acres of songbird habitat through the Save the Songbirds Program.
1 . A space no larger than 10’x15 feet will do. If you can set aside more space that is much better! Birds need a safe habitat, shelter, water, and food.
2 . The shelter is a combination of trees, bushes, shrubs, bird houses and bird boxes. These plants may take a couple of years to grow. Shrubs and bushes grow much faster than trees. Choose plants songbirds like. Visit your local nursery and buy only drought-resistant plants. My favorite bird is the mocking bird. They love people and will live with you, reproduce, and sing for you many days during the growing season. Our pair returns each spring, nests in a bush by our window where we can watch, and sings much of the day.
3 . An upside-down garbage can lid may be used to hold water. Just clean it out and refill as needed. Keep it up off the ground to protect birds from cats, etc. You can buy a water holder on a stand for a few dollars as well.
4 . Go to google for information on cheap homemade bird – feeders. Or buy a couple already made. If your bushes produce seeds or berries this supplies some food. You may supplement this with bird food purchased at the store. Many songbirds love sunflower seeds.
5 . Bird houses or bird boxes are easy to build or they may be purchased. I like to snuggle them behind bushes on the wooden fence for privacy. Some birds will build nests in the bushes and in the trees. They don’t want predator birds to see them when they are nesting.
6 . I like to have a table and some chairs in the sanctuary so we can sit around it and take in the quiet beauty and feel the peace of these small green places. A hammock is nice. This is your SANCTUARY. It is a safe place for all of you. It is a great stress reducer. Autistic children thrive in the garden – sanctuary. Walk away from the many distractions of life and feed your soul in this quiet place.
7 . Every one of the Kid’s Ecology, SPICE concepts may be taught and practiced here and in the garden. That webpage is found in the EXPERIMENTS section of this website.
ADDING THE CHILDREN’S GARDEN

This is my 12 ft.x15 ft. raised bed garden built on a slope. The Songbird Sanctuary is off to the right. Both are tucked in at the back side of our small yard in an urban subdivision.
Practical Benefits – You may choose to use only natural pesticides like Insecticidal Soap mixed with water and sprayed on the top and underside of the affected leaves. Water and hot pepper flakes sprayed on the leaves may help control insects. You may sprinkle wood ashes on the ground around the affected plants as it gets into the insect’s breathing passages and smothers them. “Diatomaceous Earth” from the garden store does the same. For aphids you may sprinkle it on the top and underneath leaves and stems for a few days, then wash it off to help control plant sucking aphids, and when they die, wash it off. Marigolds and zinnias also help keep pests away.
You may choose to use blood and bone meal as fertilizer and make the garden organic. Eating food from such a garden while it is freshly picked has a great health benefit for everyone. Recent violent storms and droughts are enough reason to seek to become more self-sustainable.
KEEP IT SMALL. MANAGE IT WELL. GIVE OWNERSHIP TO THE CHILDREN!
For a small beginning in small spaces, try container gardening. I grow tomatoes, herbs, climbing cucumbers on the patio and in the flower beds! They mix well with the marigolds and zinnias I plant in several places for insect control as well as for attracting pollinators to the garden. I put some flowers of this kind in the small vegetable garden also.
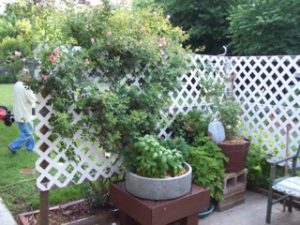
Patio Container Gardens
In early March I plant seeds for the salad garden, onions, and radishes. I plant salad seeds close together and by late March we are eating these baby greens as we thank the plants. These healthy, mild tasting salads are served every day. In late March I plant seeds of hardy marigolds and small zinnias in the small garden and in the flower beds. Harmful insects do not like these flowers.
Start bushes and/or trees in the wild bird sanctuary in early spring or late fall. Mulch and water them often, unless it rains, until they are fully established. To avoid fungus water only at the base of the plant. Mulch around these plants. Put out water and food for nesting birds.
DESIGN – There are many small garden designs but mine is a 12 ft. x 15 ft. raised bed garden. All plants were removed and we put down hardware cloth to keep roots or plants from coming up through the soil which was added later. (Because our yard is on a slope we had to build the back of the raised bed up so the garden was level.) We used treated wood, but paving stones or large bricks work just as well. We lined the inner walls with plastic which we stapled on to the wooden walls to keep water from leaking from the garden soil through the cracks between the wooden planks. It also kept the wood from rotting.
LIGHT/HEAT/WATER/SOIL – Our garden receives morning sun and mid-afternoon shade. This is ideal as Oklahoma gets very hot in July and August. The intense heat may cook the leaves. Thus, we harvest more of our garden between April and July 1. In September we plant a fall garden of green salad seeds which perform well until around Christmas. After that we put the garden to rest for the rest of the winter after the plants are removed and mulch is laid down to help keep moisture in the soil protecting soil organisms. Each spring we add 3-4 bags of topsoil to keep minerals in the soil.
WATER – We have placed plastic 50-gallon drums which are inter-connected with the water drain. A little valve is located near the bottom of the barrel. If you have no drains just watch where most of the water comes off the roof during a rain and put your barrels there. It is usually where two sloping parts of the roof intersect. Here we can get rainwater to provide water, as needed, for the small raised bed garden and plant containers. This is called a Water Catchment System and they may be purchased for about $60 each or you can easily make your own. Free barrels and kits are given away every spring by our Park Dept. because they want us to conserve water.
In our 12 x 15 raised bed garden, we put 5 cubic yards of good sandy loam top soil in the garden box. For a regular garden, some people choose to remove all the grass and plant directly in the soil that is there. If you enrich the soil first with some good topsoil and nutrients such as blood and bone meal and manure, this works fine too. It just produces more weeds and grass and is harder to keep out of the vegetable spaces. Putting a border around it helps some with that problem.
REDUCE – REUSE – RECYCLE All plant materials you do not eat are torn apart and composted. But you continue with the layering of plants, soil, fertilizer as you go along.
Make a compost heap or bin at the beginning as follows: Set aside a space at least 3 ft. x 5 ft., line the bottom with hardware cloth to keep out tree roots, then build the sides of lattice work so air moves through the system. I put a layer of chicken wire around the sides to keep the composting material inside the bin. Put down a layer of plant material about 6 inches deep.
Cover that with a 1- or 2-inch layer of fertile topsoil, then cover that with a handful of blood and bone meal. Continue to make layers as you have more plant material to recycle. Keep the compost moist. Microscopic organisms in the top soil, insects, sowbugs, and other organisms will begin to eat the plant material. Their body waste and decay help to change the discarded plants into a rich black humus. It is good to use a pitch fork to turn over the mixture in the heap to speed up composting. A good schedule is every 2 weeks or once a month.
Add coffee, tea grounds and veggie bits from the kitchen. You may even tear up strips of news paper and compost it with the other materials. Do not put meat in the compost heap. It stinks. You can put pet manure in it as well as other kinds of manure from chickens, pigs or other animals.
It is this compost which helps keep your garden soil productive for many years. That humus from the compost heap is added in the rows as we plant the seeds or seedlings. I also add a little blood and bone meal on top of the humus and mix it up, putting the seeds on last. Each spring I add about 4 bags of topsoil to my little garden but all the rest comes from the compost heap and the soil already in the garden. It is rather like taking care of a swimming pool where you use the same water for a long time by just adding a bit of fresh water for that which evaporates.
MAINTENANCE – In a raised bed garden there is not much maintenance. That makes it great for kids and senior citizens. Keep the garden watered as needed. Observe insects and remove the harmful ones you find. Expect insects to eat some of the plants or eat a part of the leaves. Spraying with Insecticidal Soap and water on top and underneath leaves, or sprinkling hot pepper on the ground around the plants, or sprinkling a little wood ash on the plant, and around the plant, which clogs insects’ breathing passages are all effective means to control insects. Remove and recycle plants which have completed reproduction and put them in the compost bin.
To keep the fungus off the leaves always water the plants from the bottom. I put a gallon jug with little holes in the bottom beside each larger plant, add a little sand on top of the holes, then fill the jug with water which slowly goes down to the roots where it is needed.
For several months a year The Children’s Garden will produce fresh, delicious, healthful safe food. This food is touched by the kiss of the sun in your own backyard. If your children have owned it and cared for it, they will reap the strong, healthy, happy benefits expressed earlier. Just be sure you do the supervising of their work and help with internet research as they are learning how to have a good garden.
AS WINTER COMES – Remove the used-up plants, recycle them in the bin, loosen the soil a little and put down mulch to hold the moisture as the soil rests for a few months. It also helps keep soil organisms like earth worms alive by keeping them warm.
THE INSECT RAP
Children use their own body parts to help them remember insect body parts as they say the words of the rap in a sing song – funny as possible manner. Body movements match up with the words, as in holding up 6 fingers as the words 6 legs are spoken. It is done slowly and with theatrical movement almost like a dance of celebration at the miracle of this bit of creation and organization of the insect.
1 . An insect is an organism with 6 legs and 3 main body parts. (Kids hold up 6 fingers and 3 fingers at appropriate times.)
2 . The 3 main body parts are the head, the thorax, and the abdomen. (For head put one hand on top of head, and one on chin.) (For thorax use hands to outline body part from bottom of neck to waistline.) For abdomen use hands to outline area from waistline to top of thighs.)
3 . Most insects have two antennae, two pairs of wings, and a hard exoskeleton. (For antennae, use index finger to make extensions going out from the forehead.) (For 2 pairs of wings, place hands on waistline and flap arms up and down.) (For hard exoskeleton, use hands and arms to outline the entire body from head to toes.
4. Stages of insect development include the: egg – the larvae – the pupa – and the adult. (Make a circle with fingers for the egg.) (Make a worm of one finger and have it crawl in space for the larvae.) For the pupa which is the sleeping stage, lay one hand on top of the other, tuck both hands alongside your cheek and close your eyes while slanting your head to the left.) (For the adult, lift both hands and arms high into the air in a manner which celebrates this miracle of insect development and reproduction.
Pat Kellogg Roller, Children’s Science Specialist, Author, Wife, Mother, Grandmother, Great Grandmother, Volunteer