Pat Kellogg Roller, Children’s Science Specialist/Teacher/Retired
INTRODUCTION/OVERVIEW
Having fun in the kitchen with high-interest, hands-on experiments.
In Part 1, students learned how to read and use THE PERIODIC TABLE OF THE ELEMENTS. They went Into The Atom and began to learn the basic chemistry vocabulary in order to do that. Various activities were used to help students get the necessary background for parts 2 & 3 Kid’s Chemistry – the experiments.
In Part 2 – in the background, the initial vocabulary is re-introduced to help students continue to grow in understanding. Now students are ready to do experiments, working in Cooperative Learning Teams, having fun while learning new concepts such as PHYSICAL CHANGE, as a change which may be reversed or undone.
They learn how to use PHYSICAL PROPERTIES, and grow in their communication skills; as they describe the changes they see in the experiments. They learn, by doing, new vocabulary words: diffusion, evaporation, condensation, and density by using water and fat-free milk in their experiments.
At this point, they are able to create a model of our Water Cycle using what they have learned. They understand how precious our fresh water is, how it is cleaned through natural processes, and used again. They recognize how important it is that rain falls through clean air, onto soil, alive with living organisms in which food may be grown. They learn many different ways they can conserve and protect this fresh water.
It is through this process of experimenting and discussion that they add to their knowledge of How Our Wonderful, Amazing, Planet Earth Works!
Beginning chemistry prepares students for high school chemistry without fear. Here we begin in grade 4. Experiments develop creative problem solving skills in our kids.
Moving molecules, physical properties and changes in solids, liquids, and gases
Experiment 1 – Ice – Water – Water Vapor
Experiment 2 – Evaporation, Condensation and the Water Cycle
Experiment 3 – Moving Molecules – Temperature
Experiment 4 – Moving Molecules – Density
BACKGROUND : HOW MOLECULES FORM “Knowing begets caring.”
MOLECULES form when atoms of elements come together. Chemists study molecules of earth stuff (matter).
Atoms of elements may share, gain, or lose an electron. If an atom loses an electron, it becomes a positive ion because it has more protons than electrons. It has a positive electrical charge.
If an atom gains an electron, it becomes a negative ion because it has more electrons than protons. It has a negative electrical charge. Since opposites attract, these two atoms may join to become a molecule.
Sometimes two atoms of the same element will join. Sometimes an atom of a different element will join another element to become a molecule.
Sometimes two atoms of two elements will share an electron.
It is this gaining, sharing, or losing an electron, which helps to create many new substances, which may be mixtures or compounds.
States of Matter
Molecules of matter are always moving. Matter may a solid, a liquid, or a gas. Matter can change its shape from one state to another by adding heat or cold to it.
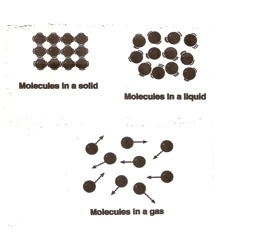
Solids – Molecules are very close together and move very slowly. They vibrate.
Liquids – Molecules move faster and take the shape of their container.
Gases – Molecules move very, very fast. They quickly fill the container and may move outside the container.
Physical Changes of Matter
All that exists on earth besides matter is energy, and energy makes things move!
Physical changes are concerned with energy and states of matter. A physical change does not produce a new substance.
Changes in state (melting, freezing, evaporation, condensation) are physical changes.
Examples of physical changes include crushing a can, melting an ice cube, breaking a bottle, wadding up or cutting up paper.
How our Planet Works
Goal: To understand that a solid may be changed to a liquid, or a liquid to a gas by adding heat.
Skills: Observing, describing, predicting, experimenting, supporting inferences with observations, identifying and controlling variables, measuring, and generalizing.
Background Information: Molecules
Matter may be a solid, a liquid, or a gas. Matter may be changed from one state to another by adding heat or cold. Experiment 1 helps students understand these three states of matter in water and how the states may change.
These changes are called physical changes. They do not produce a new substance. Physical changes may be reversed. Examples of physical changes include: melting, freezing, evaporation, condensation, crushing a can, wadding up or cutting paper, breaking a glass bottle.
Physical Properties are used to describe changes in matter. They involve the five senses such as describing matter by its: color, size, state, texture, hard or soft, rough or smooth, temperature etc…
Kids love to do “hands-on” chemistry experiments!
End background information
______________________________
Experiment 1 – Ice – Water – Water Vapor
Organization: Students work in groups of four or five students using, the cooperative learning teams in the lab” to organize themselves. A copy of this can be found in Part 1 – Kid’s Chemistry. Need more – try “Classroom Management on this website.
Materials: For each pair of students, 1 ziplock baggie, 1 ice cube, 2 paper towels, ml measuring container (baby food jars with marks are O.K.),
Materials for teacher demonstration: ice cubes, water, ml measuring containers, paper towels, hot plate, medium size pan to heat water in, tall clear glass or pint jar, food coloring, a plate to hold above the pan of boiling water, a watch
Preparation time: 5-8 minutes
Procedure and Questioning
When each pair of students has an ice cube in a baggie, and a ml measuring container, ask them to describe the physical properties of the ice cube. (See physical properties in information above.)
Tell the students, “We’re going to see who can change their solid ice to liquid water fastest. You will have two minutes to discuss with your partner how you will do it, and five minutes to conduct the experiment.
Rules: Must stay in your seat, and you can not make holes in the baggie.
Start experiment. Stop it in five minutes. Ask students to open their bags and pour the liquid water into the measuring cup and measure how much water is in the container.
Ask the students what caused the ice to melt.(heat) Let them share different methods they used to melt their ice cube. Determine which students melted the most ice and ask them to share how they did it.
In melting the ice cube, students had to apply heat in some way. Ask them to think of other solids you can melt by adding heat. (ice-cream, popsicles, chocolate, candle wax, etc…) Which would melt first?_____________ Which last? ________________ Why? ______________________
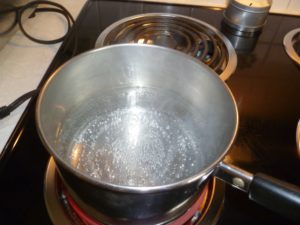
TEACHER DEMONSTRATION: Ask students what would happen if we boiled the water they collected? Collect the water and put it in the pan on the hot plate to boil.
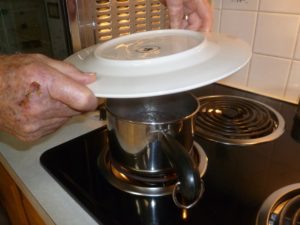
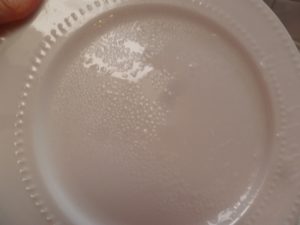
When it begins to boil, hold a plate several inches above the pan so the water vapor collects on the plate as liquid water.
Ask the students how the liquid water got on the plate? Hopefully someone will stay the water changed to water vapor (a gas), then when it hit the cold plate it changed back to liquid water.
Summarize how the ice cube changed to water by adding heat; and the water changed to water vapor (gas) by adding more heat.
END EXP. 1
______________________________
Experiment 2: Evaporation, Condensation and the Water Cycle
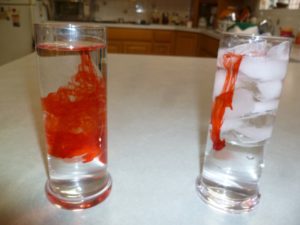
Fill the clear glass half full of water and add ice cubes until the glass is full. Add a few drops of food coloring to this water.
Ask the students to predict what will happen. (Some will say the ice will melt.)
Wait until liquid water begins to form on the outside of the glass.
Ask the students where the water on the outside of the glass came from? (Some may say from the water inside the glass.)
Ask the students what color the water is on the outside of the glass? (clear)
Ask the students what color the water is on the inside of the glass?(colored)
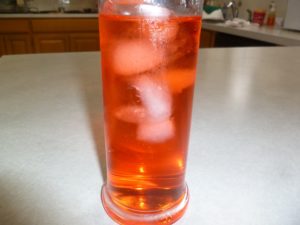
Hopefully, someone will say the water on the outside of the glass came from the water vapor (gas) in the room air. Someone else may add that the water vapor changed back to liquid water when it touched the cold glass.
Tell the students that when the water in the pan boiled and changed to a gas that is called “evaporation.”
Then when the water vapor in the air touched the cold glass it changed back to liquid water on the outside of the glass. That is called “condensation.”
Summarize: Water may be in the state of a solid, a liquid, or a gas. By adding heat or cold we can change it from one state to another.
Ask them if the water becomes a new and different substance when it changes state?
Students say, No, the water can change it’s shape its shape or state but it is still water.
Tell the students the water went through PHYSICAL CHANGES ONLY. The changes can be reversed.
A PHYSICAL CHANGE does not change the atoms in the molecules and it can be undone.
Ask students to name some examples of physical changes in matter. (melting, freezing, evaporation, condensation, break a glass bottle, cut a piece of paper, was up a piece of paper)
end Experiment 2
ACTIVITY: STATES OF MATTER, WATER CYCLE, ENERGY CONSERVATION
MAKING CONNECTIONS: More about our “amazing Planet Earth”

Caring for our amazing Planet Earth
Students, let’s talk about rain.
What is rain? (liquid water)
Where does rain come from? ( the sky)?
How did it get there so it can fall down?
Ask students to remember the experiments they have done. Review them together.
Then ask them if they can see a connection between the experiments and how rain works.
BACKGROUND: Most of the water on earth is salty and we can’t drink it. Some of the fresh water is tied up in glaciers. Only a small amount of earth’s water can be used as fresh water. This same water is used over and over. You may drink water today that was used by an Eskimo to take a bath last year. That small amount of water is all there is. We cannot go outside our planet and get more.
How does the earth use the same fresh water over and over? Can you use the experiments with ice-water-water vapor (gas) to explain?
Allow time for the student’s ideas. After a while help them pull it together and write it up like this:
The sun heats up the water in our ponds, lakes, streams, and rivers, and some of it changes to water vapor (gas) and rises into the atmosphere. This is called (evaporation).
Does salty ocean water evaporate? (Yes, but it leaves the salt behind.)
When the water vapor in the air comes in contact with a lot of cold air, the gas changes back into liquid water and collects in clouds. This is called condensation. If there is enough water in the air, it will fall through the air to the earth as rain, sleet, snow, or hail.
What do we call this process? (The Water Cycle)
Have students draw a model of the Water Cycle and label the parts explaining how it works.
What happens to rain when it falls through dirty (polluted) air? (It gets dirty too.)
What causes air to get dirty (polluted)? (dust, soot, gases formed when fossil fuels are burned as gasoline or to generate electricity. The fossil fuels are: coal, oil, and natural gas.
What are scientists and engineers doing to help clean our air? (They are developing alternative sources of energy which do not pollute the environment such as solar energy, wind energy, biomass energy from plants and animal waste, fuel cells, etc… These sources do not pollute the air when they are used to make electricity. (Check out “MAKE A KITE,” “KITE EXPERIMENTS” MAKE A SOLAR OVEN” on this website.)
What can we do to help clean the air? GENERATE ANSWERS FROM THE STUDENTS.
Some Ideas: use less gasoline, walk, carpool, or ride our bikes. (Check out on this page – “EARTH CARE AND SHARE.”
We can save electricity, which is mostly made from coal, oil, or natural gas, by closing outside doors and refrigerator doors when not in use, use less water by taking short showers and turning off the water taps when not in use.
We can help clean and cool the air by planting trees, by growing backyard gardens, and by recycling paper, plastic, and metal cans. We can avoid littering. END ACTIVITY
Quizzes are important. The vocabulary and concepts they are learning, by doing, is very important. I like to make up review questions and let the kids work in groups to review and prepare for the quiz. I like to give short quizzes. For kids who do not read well, I usually put the test questions on a C.D. with a paper copy of the test and they can write the answers on the test sheet or give oral answers with the tape recorder. I like for everyone to enjoy science and to be successful. The extra effort is worth it.
______________________________
Experiment 3 – Moving Molecules (Temperature)
PROBLEM: How does temperature affect the diffusion of food coloring in liquids?
Diffusion means the speed at which molecules of different liquids move. Density means how thick is the liquid.)
MATERIALS: ice water, warm water, 8 tall clear glasses (or pint or quart jars), one color of food coloring, stop watch, thermometers, lab sheets (a chart would be nice).
Procedure: Glass #1 – room temperature water. Glass #2 ice water. Record temperature of both. Put in food coloring, start timing and observing. Which water diffused first? _______ last? _______ why?_____
(Note for the teacher only.) Put out only one color of food coloring for all experiments. water is least dense, and skim milk most dense. Food coloring moves fastest in very warm water; and slowest in ice water and in skim milk. When the students observe this you can ask the following questions.
(Note for the teacher (continued) It’s good to allow one team of 4-5 students to demonstrate one part of each experiment for the class to observe. I suggest the teacher control the stopwatch and let students do the rest. Refer to Cooperative Learning Groups Lab. ( See Part 1 – Kid’s Chemistry, near the end of that section.
Be sure students put the same amount of liquid and drops of food coloring in each container in every experiment. In this way, you control these two variables. Talk to your students about the importance of controlling variables in order to know what caused the results.
______________________________
Experiment 4 – Moving Molecules (Density)
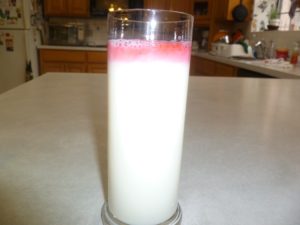
Ask students to predict which liquid, water, or skim milk will be most dense (thicker) at room temperature. _____________________________________________
To test this, set up two clear glasses or jars. Put the same amount of each of the liquids in each container. One jar has room temperature water, the other room temperature fat free skim milk.
Take the temperature of each liquid to be sure they are both at room temperature. Record temperatures.Test one liquid at a time and record results._______________________
Drop food coloring into water and immediately start stopwatch. Record time it took the food coloring to color all the water.___________________________
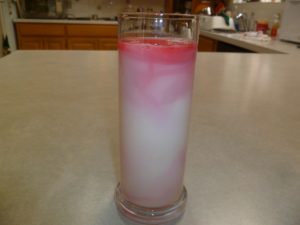
If diffusion of food coloring in the skim milk is proceeding very slowly, ask students how they might speed up the diffusion process. Don’t allow them to stir, or shake the milk.
Ask students what they learned about diffusion and the density of the liquids. After discussion, summarize the results.
FACT: The more dense (thicker the liquid), the more slowly the food coloring will diffuse into the liquid. Density does matter in moving molecules.
Which liquid was most dense? _________ List the liquids in order of least dense to most dense. _____________________________________________
BIG IDEA: Heat will increase and cold will decrease the speed of molecular movement in water.
How does density affect the diffusion of liquids ?
The End