Greetings from Pat Roller, Children’s Science Teacher for children ages 4-12.
Introduction/Overview – Organizing for Success in Kids Hands-On Science
Early in my career teaching hands-on creative problem-solving science to 150 children a day in grades 2-6, I had reached ‘burn-out.” Nothing in college had prepared me for this. One Saturday, a week before school began, I attended an eight hour seminar presented by Dr. Harry Wong on CLASSROOM MANAGEMENT FOR CHILDREN’S SCIENCE.
I worked day and night implementing what he had taught me. I was ready, on the first day of school, to be an effective teacher. I was organized for success! Using Dr. Wong’s instructions, I became a highly successful children’s hands-on science teacher as well as facilitator for other teachers. I could handle 5 classes a day, with up to 35 children per class, in grades 2-5 and later, grades 6-8. I rarely had any assistance other than my students. That’s why I include his teaching on this website.
Now 25 years later, I meet my students who became doctors, research scientists, nurses, engineers, college professors, classroom teachers, and community leaders in the areas of energy and environment.
Why did so many of my students go into these fields for their life’s work? I believe it was the foundation we gave them in elementary, and middle school in all the areas of science, including chemistry. The kids were not afraid to take the harder courses in high school and then in college. They knew, by their former experience, they could do it, and they did!
If you would like to be this kind of teacher, then stay with me and I will outline for how to “organize for success” which includes:
-
Collecting basic materials needed for “hands-on” science for kids, and how to get them cheaply if not free. (pdf file for Collecting Basic Materials)
-
Storage for all the materials you collect. (pdf file)
-
Organizing the “hands-on” science classroom.
-
Getting to know your students QUICKLY. And, getting your students to know each other!
-
Helping kids organize their 3 ring binders just for science.
-
Teaching the Scientific Method through practice,” song, rap, poetry, and experiments,”teaching “kids to work in cooperative learning groups, with each child being responsible for a job in a group.
Classroom Management
Purpose or goal
First – the overall purpose of elementary and middle school science education is to offer students many “hands-on” activities and experiments, which are used to develop creative problem solving skills as children begin to learn how our wonderful, amazing Planet Earth works.
Second – to teach students that everything, including themselves, is made from earth materials.
So, let’s begin.
BE WELCOMING – Each day I met my students at the door welcoming them into the science laboratory. When they were seated I said, “Today we are going to learn a little more about how our planet works.
How I Collected Basic Classroom Materials
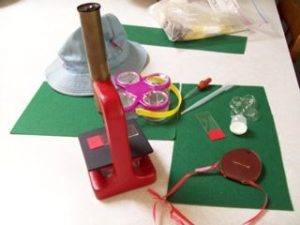
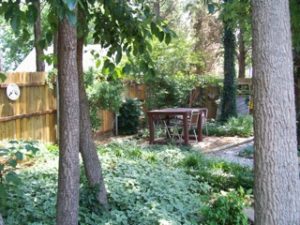
When I taught kid’s hands-on science I did not purchase the expensive kits. I had learned that the plastic contents would break easily; and often a kit which cost up to $250 taught only one unit of science to one grade level of children. Instead, I organized my classroom using free and inexpensive multi-use materials. My students learned it was good to reduce, reuse and recycle everything. I could equip a classroom for a year of science for the cost of one expensive kit. The next year I would continue to build my lab by using last year’s stuff and adding to it. I wrote grant proposals to the local education association in order to get funds to develop the Outdoor Classroom, and to buy some sturdy, kid-friendly microscopes, some pan scales, some centimeter cubes, and some slightly heavier weights. One cubic centimeter cube weighs one gram.
Getting Ready for and Teaching the First Few Weeks
Making sure everyone knows everyone – Organize the classroom to match your seating chart. Use letters to denote rows, and numbers to denote individual desks. Tape these to the desks. Prepare a “Getting to Know You” seating chart for you to use on the overhead projector for each class of students you will teach.
Print a copy of this seating chart, punch holes in it for filing, and place a copy on each desk, before the students arrive. Here you are, teaching math on your first day of science! What do the kids think about this? (Mine were amazed I was getting to know them the first day of school!)
Greet your students at the door with a hi and a welcome! Be invitational. After all the students have seated themselves, go to the overhead projector where your chart is. Ask each student to put his/her name at the top of his seating chart with the Class Period. Starting with Row A – Desk 1, ask the student to rise and give his name. Write this name neatly in the box on the overhead seating chart. Ask each student to do the same with his/her seating chart.
Continue this procedure until each student is named on your chart and all their charts as well. Your students never expected you to be teaching math and science on the first day of school. They will be impressed and they will know that you already know who each one is – sad for those who would misbehave. Adapt this to whatever your classroom situation is.
Begin to practice together getting to know each other. Ask students to take the charts home and study them. Have those who brought notebooks, file the seating chart in their notebook. Have extra charts for those who will lose these loose sheets. This will help make more sense to them when you demand that all science papers be filed in the notebook later.
During the first few science days, take 5 minutes and have everyone tell the class who sits in their row, who sits in front of them, and who sits in back of them. Getting to know each other quickly is very important for group work later.
Ask all students, who can, to bring their science notebooks to class each science day. Give them a couple of weeks, then provide notebooks for those who cannot afford them. See Collecting Basic Materials and Storage for the materials you collect. See beginning of this webpage. REMIND EVERYONE that he/she WILL NEED 5 DIVIDERS AND ABOUT 35 PAGES OF NOTEBOOK PAPER in the notebooks.
Focus on Success (Play detective now.) – Now that you have their names, go to the student files and learn the talents and troubles of each student. Go to their former teachers for help as well. Before you ever form groups, find the trouble makers, the leaders, the peacemakers, and kids who have trouble reading and writing.
For the first 10 days, study your students carefully, then USE YOUR KNOWLEDGE TO FORM GROUPS WITH 4-5 STUDENTS PER GROUP. Make up a group list for each class. Each group needs a Principal Investigator, a Recorder/Reporter, a Materials Manager, a Maintenance Director, and an Observer. Write in who is to do what. DO NOT POST YOUR LISTS OR TELL THE KIDS ABOUT WHO IS IN WHICH GROUP YET. (At the end of this webpage you will find group and job assignments for each person in each cooperative learning group.)
In the first days of school you all work together in one large class group. Group work does not begin until the kids know how to use the Scientific Method. Explain to your students that they will work as real grown-up scientists work. With second graders simplify – third grade and older can do it all.
When small group work does begin, post the lists, and tell the kids the jobs will be as needed in the small groups in the early day. Tell them the jobs will be rotated over time so others get to do other jobs. Observe carefully and train them in their jobs. Post a list showing the jobs and what the person in each job does for student reference. Help as needed.
Creating the classroom atmosphere – Together make a few class rules. Six should be plenty. Be sure to include positive behaviors: cooperation, kindness, caring, focusing on the task, and doing their best every day. Have kids copy the class rules and file them. Assign them for homework. Practice them. These behaviors are essential for small group work. OF GREATEST IMPORTANCE IS THE BEHAVIOR OF THE TEACHER: firm, fair, consistent, optimistic, supportive, encouraging, enthusiastic. Post a list of the rules in several places in the room.
Helping kids organize science notebooks. – Learning to use these notebooks will make science easy and fun and will help these children all their lives as so much on our planet in the education and business world is based on the use of 3 ring binders (notebooks.) Decorate the fronts of the notebooks to denote something about science and how our planet works. Put titles on the 5 dividers as follows: 1. Homework and Notes to Parents, 2. Experiments, 3. Vocabulary and notes, 4. Test Reviews and Tests, 5. Projects.
Tell the students you will take up the notebooks and grade them. If they keep their work neatly filed, they can earn lots of grade points. In the first 6 weeks of school, check out the kids to see how they are doing. Help those who are tangled up, or get a student who knows to help. Encourage and support them. Practice patience. Don’t give up.
Keep a supply of reinforcements for torn page holes. Provide hole punchers for handouts, unless you have pre-punched them. If they do it, show them how to measure to do it well. Actually, I preferred to pre-punch hand-out pages I copied for them.
Work with your students until most are easily filing every paper you do not take up to grade. Have them put their name and class period on every page. When you return papers, have students file them appropriately.
Before school begins set up an isolation area – Private places are great for this, but you may have to settle for a classroom area with a small screen and a few desks. Make a folder for each student, get a few science books, and make up some questions and answer sheets. For kids who are not ready to work in groups, put them to work on these materials and give them credit for their work. Make sure they can hear what is happening in the groups. Tell them you would love for them to be able to join a group. Post the behavior rules so they can see them all the time. Be supportive, optimistic, and encouraging. Some of these kids are starved for attention. Give them a bit of positive attention. Most will grow to join the groups.
Learning the Scientific Method and How to Use it Together.
This introductory work is done in a whole class group, with the teacher at the overhead projector or chalkboard as the leader. She calls on individual students to help her. She asks questions. Students make predictions etc., For practice, before the lesson, collect several magnetic and non-magnetic materials, and a magnet. Tell the students you will conduct an experiment using the Scientific Method as adult scientists do. Tell them they will learn how to experiment in their small groups using this method, often.
- Step 1 – PROBLEM – It tells what we want to learn. (Example) Which of these materials will stick to a magnet? (are magnetic) Write this down. ___________________________
- Step 2 – HYPOTHESIS – It is a prediction which tells what we think will happen in the experiment. (Example: I predict the ___________, _______________, will stick to the magnet and the ______________, _________________ will not. (write it down.)
- Step 3 – MATERIALS – Make a list of the materials to be used in the experiment. Write it down.
- Step 4 – PROCEDURE – Here you tell, step by step, what you did in the experiment. Write it down. (What did you do in the magnet experiment?)
- Step 5 – RESULT – What happened in the experiment? Write it down.
- Step 6 – CONCLUSION – This states, “My hypothesis was (true) or (false). Look back at your hypothesis (your prediction), this will help you see if you predicted correctly.
- Step 7 – WHAT I LEARNED – Briefly write down what you learned. (I learned _____________, _____________ were magnetic and _______________, __________, were not.
Lead your students through 2 or 3 more simple experiments such as the above, writing down each step, asking students to predict, asking students to come up and do parts of the experiment etc.
Make a pre-punched handout of the Scientific Method and the meanings and give one to each child to study as homework. Encourage them to use rap, music, songs, poetry, whatever creative method they can think of to help them remember the order of the steps, the steps, and the meaning of each part of The Scientific Method. This will let you know if you have students in each group who can follow the method.
When students return to class, ask if some would like to share their creative ways of teaching themselves. This provides fun and more practice for all. Students need to know this before they begin to experiment in small groups using it. Allow students to work in their groups to review for the test.
Give a little test. This will help you learn if some students in each group know how to follow the Scientific Method in experimenting. The same is true of metric measurement. Students need to practice reading the rulers, and measuring liquids.
Assigning Groups – It is now time to post your lists, get the kids in groups, emphasize what each person’s job means (let them tell what they think), and begin to conduct experiments using The Scientific Method of exploration. Find the groups which are doing really well and call attention to them, repeating what makes groups work well: cooperation, caring, helping each other, focusing on the task, doing each job well and reaching for a good grade for everyone in the group.
Conclusion – organization is the key. This work of organizing your materials, organizing the classroom, helping the students organize themselves, helping students learn how to use The Scientific Method, and helping them learn responsible behaviors lays the groundwork for a great year of kids building their creative problem-solving skills while beginning to learn how our planet works. On this foundation success will be there for you and every one of your students.
Remember on every science day begin with: “Today we will learn a little more about how our wonderful Planet Earth works. This is good to know since everything, including us, is made from our planet’s materials. Children will be able, with your help, to link everything in science with how our planet works. Foundations will be laid such that children are not afraid of the high school science subjects. They will be ready and you will have made it happen for these children and for your country.
Congratulations on sticking with me this far. What I have told you works. I know because I worked it for 25 years with thousands of children in grades 2-8. And, I loved my work!
Cooperative Groups in the Lab
GOAL: The activity will be completed in such a manner that everyone in the group will have a chance to participate, to share, and to learn.
PRINCIPAL INVESTIGATOR
This person will assume responsibility for:
- Team Safety,
- Following activity procedures in sequence.
- Involving everyone in the group.
- Completing the tasks.
- Asking facilitator for help as needed.
RECORDER / REPORTER
This person will assume responsibility for:
- Gathering experimental data from group members.
- Doing necessary math,
- Reporting the results when requested.
MATERIALS MANAGER
This person will assume responsibility for:
- Picking up needed material for the group,
- Disbursing materials properly to group members.
- Returning materials at the end of the activity.
MAINTENANCE DIRECTOR
This person will assume responsibility for:
- Cleaning up lab/act area as needed.
- Assisting materials manager as needed.
OBSERVER
This person will assume responsibility for:
- Checking to see how well each team member participated.
- Giving an overview of how well the activity was conducted in terms of following directions, recording data, finishing the task, and working cooperatively in group cleanup.